ONE WEEK PORTRAIT CHALLENGE
- Jonathan Whittingham

- Apr 7, 2020
- 3 min read
Updated: May 19, 2020

I was on Instagram and I follow a page called "Paintable" they do tutorials on all sorts of thing, from landscapes, storytelling, portraits and objects. I saw this One Week Portrait Challenge on their story and thought I'd give it a try. I signed up for it and what they do is send me a video each day with tutorials on how to digitally paint a portrait. So Day 1 is the outline, Day 2 is the base colours, Day 3 is rendering, Day 4 is details and Day 5 is style. The instructor David Belliveau is a great artist who instructs me through the process of creating the portrait. Each video is about 30 minutes and goes into detail about how to create each layer of the painting.
This is a video from their Youtube channel. I would post the one of the challenge itself however they take the videos down after that week, it's kind of like a limited offer challenge. This video shows a similar method just in a different way.

Day 1: I created the outline of the portrait. I started with a simple outline of the shapes that I saw in the face, hair and shirt. I then added finer details and added more complex shapes to the subject to make it look more like a face. Then I added the facial features, eyes, nose and lips to finish of the outline drawing.

Day 2: This step was about the colours, I laid down the base colours of the portrait and then I added the highlights and shadows in blocks of solid colour. This is important because what a lot of beginners do is paint the whole face with a soft edge brush and this can make the image look faded and fake. Using a hard edge brush helps to find the planes of the face and it is also easier to turn a hard edge into a soft edge and than it is to turn a soft edge into a hard edge.
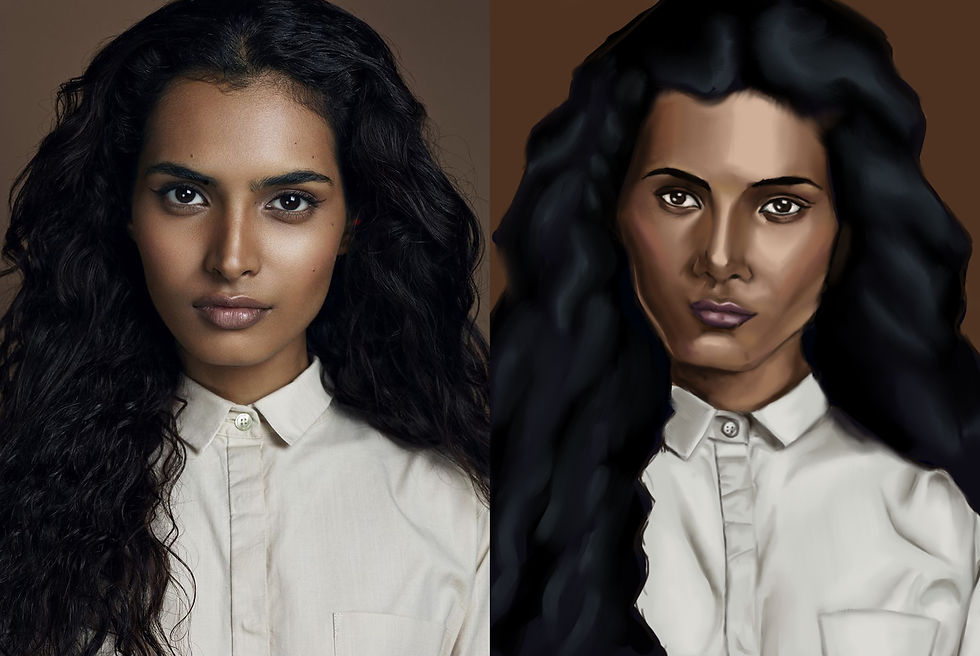
Day 3: This day I rendered the face which means I blend the edges that need softening, I think I had the most difficulty with the shirt as I'm not use to painting fabric. I quite liked this part of the process as I was starting to see the image form together, and I already can see an improvement from previous portraits that I do where I usually spend about a day max on them. It definitely helps to create something over multiple day and take your time.

Day 4 & 5: These days I spent more time on the finer details of the portrait, I spent more time blending the portrait to make the skin look a bit more realistic. I also added small details like pores and freckles on the skin. I also added finer strands in the hair to make it look more real. To add my own style to this I used a few different texture brushes and layered them above the portrait and tried a bit of colour dodge to make colourful highlights.

I'm really happy with how this final piece turned out. The instructor said, by the end of the week this will be the best portrait you have ever painted, and he was right, I think this is the best portrait I have painted. There are still things that I need to learn but painting this taught me a lot about being patient and taking time with my artwork, sometimes doing this can give you better results.


Comments